众所周知,RN和H5的区别在于:RN是使用Native组件来渲染的,而H5是依赖WebView。那么RN是如何做到写js代码,渲染Native组件的呢,这篇文章我们深入源码,一探究竟。使用的RN版本是v0.62.0
JS侧的UI是使用React来实现的。熟悉React的同学,都知道React使用jsx来写布局,然后会转换成虚拟dom树,最后再渲染到浏览器的真实dom里,那React Native是怎么做的呢?
为了方便阅读,这里先把文中提到的一些函数列出来:
一、启动
以默认的demo为例,我们的代码入口在App.js,并且导出了jsx渲染函数。
const App = () => {
  return (
    <View key={'view-parent'} style={styles.parent}>
      <Text key={'text-1'} style={styles.text1}>
        Hello World!
      </Text>
      <Text key={'text-2'} style={styles.text2}>
        zey RN Test
      </Text>
    </View>
  );
};

export default App;
在根目录的index.js里会把这个函数根据appName,注册进去。
import {AppRegistry} from 'react-native';
import App from './App';
import {name as appName} from './app.json';

AppRegistry.registerComponent(appName, () => App);
看下注册函数:
registerComponent(
  appKey: string,
  componentProvider: ComponentProvider,
  section?: boolean,
): string {
  let scopedPerformanceLogger = createPerformanceLogger();
  //存在runnales里
  runnables[appKey] = {
    componentProvider,
    run: appParameters => {
      //运行run的时候,开始执行渲染。
      renderApplication(
        componentProviderInstrumentationHook(
          componentProvider,
          scopedPerformanceLogger,
          .....//省略
        )
      );
    },
  };
 	.....//省略
  return appKey;
},这里把渲染函数存在runnables对象里。那么,是什么时候开始执行这里注册的runnables呢?这里就和客户端的调用有关了。
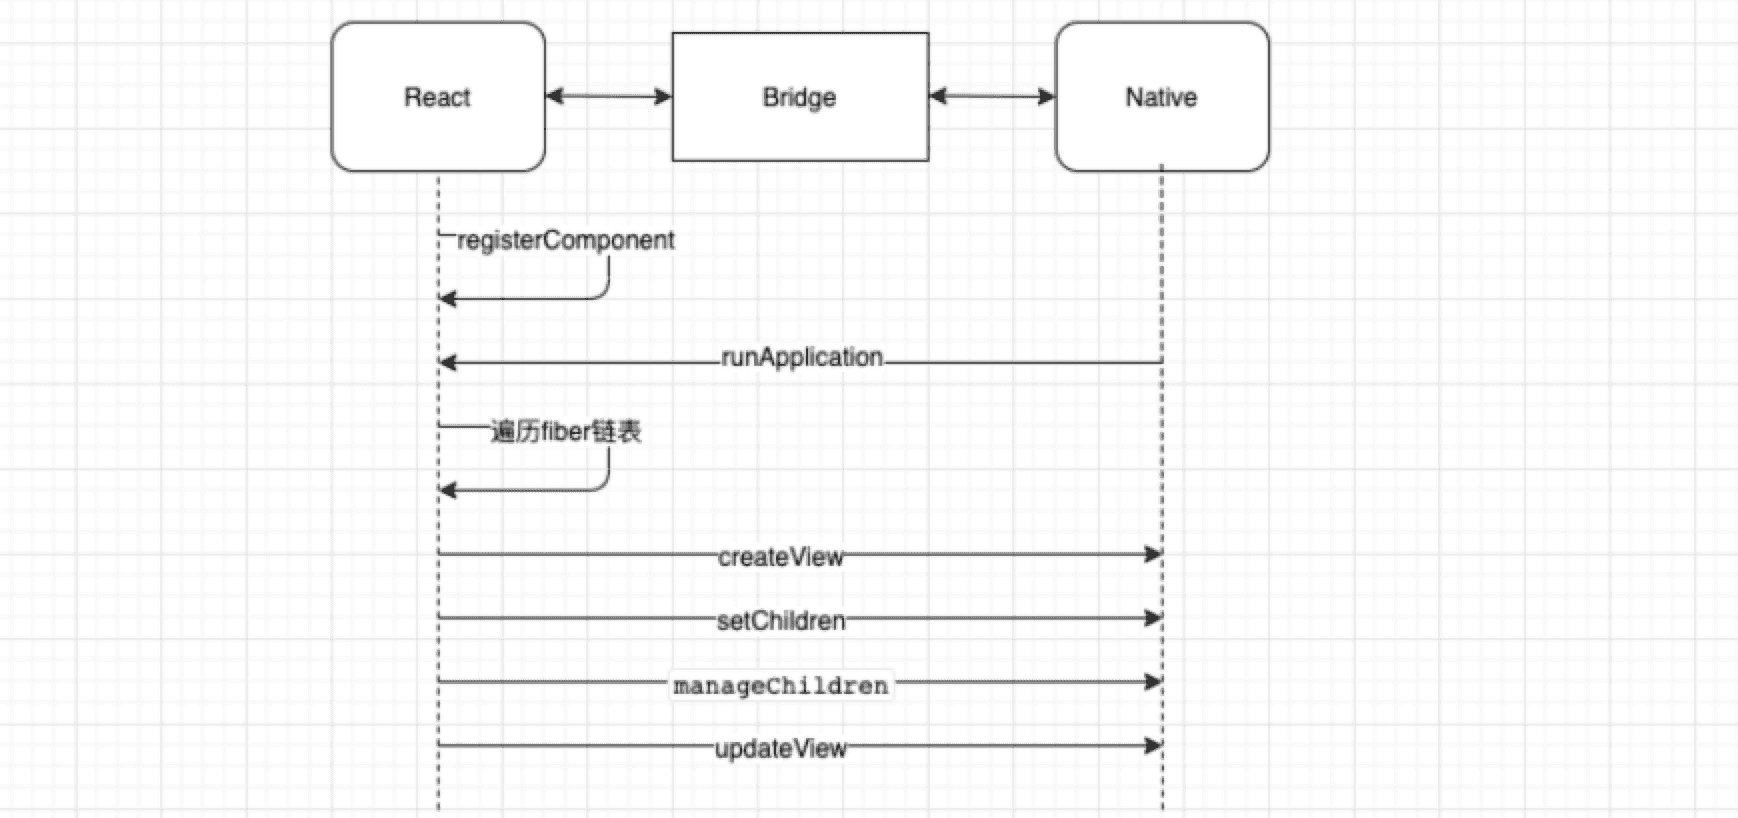
在启动RN页面时,客户端内部会调用下面这行代码,调用runApplication,传入对应的appName和一些参数。
catalystInstance.getJSModule(AppRegistry.class).runApplication(jsAppModuleName, appParams);然后在js里AppRegistry.js就会执行对应名称的注册函数:
runApplication(appKey: string, appParameters: any): void {
  .....//省略
  runnables[appKey].run(appParameters);
},可以看到走到了renderApplication里执行渲染逻辑。
再跟进去会发现有两个选择,ReactFabric和ReactNative,Fabric就是RN的新架构,现在最新的代码还是用的ReactNative:
  GlobalPerformanceLogger.startTimespan('renderApplication_React_render');//渲染计时开始
  if (fabric) {
    require('../Renderer/shims/ReactFabric').render(renderable, rootTag);//令人期待的新框架Fabric
  } else {
    require('../Renderer/shims/ReactNative').render(renderable, rootTag);
  }
  GlobalPerformanceLogger.stopTimespan('renderApplication_React_render');//渲染计时结束
二、遍历虚拟dom
接下来的渲染逻辑就和React非常相关了。(其实就是React的代码
进入Render函数:
render: function(element, containerTag, callback) {
  var root = roots.get(containerTag);

  if (!root) {
    root = createContainer(containerTag, LegacyRoot, false, null);
    roots.set(containerTag, root);
  }

  updateContainer(element, root, null, callback); //进入这里继续执行渲染
  return getPublicRootInstance(root);
}
在updateConainer里会创建一个update,并且插入到队列里,然后执行队列,接下来就是对组件树的遍历了。
var update = createUpdate(expirationTime, suspenseConfig);

update.payload = {
  element: element
};

enqueueUpdate(current$$1, update);
scheduleWork(current$$1, expirationTime);
接下来就是不停地检查、插入队列、根据优先级处理(但这里是串行的,并没有异步),这里省略具体代码,依次的函数调用顺序如下:
updateContainer
scheduleUpdateOnFiber
flushSyncCallbackQueue
flushSyncCallbackQueueImpl
runWithPriority
performSyncWorkOnRoot
workLoopSync
在workLoopSync里,我们可以看到一个while循环,这里就开始遍历组件树了
function workLoopSync() {
  while (workInProgress !== null) {
    workInProgress = performUnitOfWork(workInProgress);
  }
}react遍历树的时候有两个重要的函数performUnitOfWork和completeUnitOfWork。我理解performUnitOfWork就是深度遍历到底,然后执行completeUnitOfWork回退,同时创建对应的dom/Native组件。也就是先创建的子节点再创建父节点的。
看下performUnitOfWork的部分代码:
function performUnitOfWork(unitOfWork) {
	//开始处理,会返回子组件fiber实例,用于深度循环遍历,把任务加入队列
	next = beginWork$$1(current$$1, unitOfWork, renderExpirationTime);

  if (next === null) {
    // 不存在子级fiber,完成当前单元任务的处理。
    next = completeUnitOfWork(unitOfWork);
  }

  return next;
}
这样就完成了一个子集任务的内容。
在completeUnitOfWork里,主要就是找父组件回退、找兄弟组件继续遍历:
function completeUnitOfWork(unitOfWork: Fiber): Fiber | null {
  workInProgress = unitOfWork;
  do {
    //完成当前的工作
    next = completeWork(current, workInProgress, renderExpirationTime);
		//兄弟组件
    const siblingFiber = workInProgress.sibling;
    if (siblingFiber !== null) {
      //返回兄弟组件继续遍历
      return siblingFiber;
    }
    //否则回到父组件继续完成工作
    workInProgress = returnFiber;
  } while (workInProgress !== null);

  return null;
}
从这里可以看出,React遍历组件树深度遍历走到底了,就算作一个单元,完成当前的渲染工作。
这样做的好处是,可以把遍历工作分散成小单元工作。这也是Fiber的一个重要设计思路。可以避免一次渲染大量组件而阻塞了线程。导致用户操作没有响应。更多关于组件Fiber链表和遍历的介绍可以看这个文章
三、创建Native组件
创建组件是在completeWork里完成的。里面有很多不同类型的组件。里面涉及创建真实渲染的Dom或Native组件的是HostComponent,这个组件最后会调用createInstance来创建组件。
激动人心,终于要创建组件了!
function createInstance() {
  var updatePayload = create(props, viewConfig.validAttributes);
  ReactNativePrivateInterface.UIManager.createView(
    tag, // reactTag
    viewConfig.uiViewClassName, // viewName
    rootContainerInstance, // rootTag
    updatePayload // props
  );
  var component = new ReactNativeFiberHostComponent(tag, viewConfig);

  return component;
}
这里主要是调用了UIManager的createView方法,传入了tag、viewName、rootTag、props参数信息。这里的UIManager实际上是映射到Java里的一个class--- UIManagerModule. 对应的函数如下:
public void createView(int tag, String className, int rootViewTag, ReadableMap props) {
  mUIImplementation.createView(tag, className, rootViewTag, props);
}
mUIImplementation的createView是这样的:
public void createView(int tag, String className, int rootViewTag, ReadableMap props) {
    ReactShadowNode cssNode = createShadowNode(className);
    ReactShadowNode rootNode = mShadowNodeRegistry.getNode(rootViewTag);
    cssNode.setReactTag(tag); // Thread safety needed here
    cssNode.setViewClassName(className);
    cssNode.setRootTag(rootNode.getReactTag());
    cssNode.setThemedContext(rootNode.getThemedContext());
    mShadowNodeRegistry.addNode(cssNode);
    ReactStylesDiffMap styles = null;
    if (props != null) {
      //这里这里!!! ---元素的样式解析、赋值
      styles = new ReactStylesDiffMap(props);
      cssNode.updateProperties(styles);
    }
    handleCreateView(cssNode, rootViewTag, styles);
  }
}
这一步主要是把样式和一些配置解析出来,方便下一步渲染。
执行handleCreateView之后,会把这些信息转换成一个对象,放入队列里,等待执行。
我们直接跳到执行创建的地方:
NativeViewHierarchyManager.java
public synchronized void createView(
    ThemedReactContext themedContext,
    int tag,
    String className,
    @Nullable ReactStylesDiffMap initialProps) {
    ViewManager viewManager = mViewManagers.get(className);
    View view = viewManager.createView(themedContext, null, null, mJSResponderHandler);
   	viewManager.updateProperties(view, initialProps);
}可以看出,创建是通过ViewManager来创建View的,这个ViewManager有很多不同的实现类用来实现不同的Native组件,除了官方提供的常见的以外,业务方也可以根据自己需求实现。比如文本Text标签,对应的ViewManager实现是ReactTextViewManager对象。如此得以创建真实的Native节点。
四、操作组件
上面的流程创建出了Native的组件,但是仅仅创建是不行的。还需要根据父子关系来把子组件添加到父组件里面。
所以createInstance之后又会调用UIManager.setChildren来设置组件的父子关系:
对应的安卓代码如下:
 /**
   * 快速添加初始View的接口,子View 的tag 被认为是按元素顺序排列的
   * @param viewTag the view tag of the parent view
   * @param childrenTags An array of tags to add to the parent in order
   */
  @ReactMethod
  public void setChildren(int viewTag, ReadableArray childrenTags)
因为是UI创建阶段,所以只需要执行添加就可以了。setChildren相当于一个简易操作UI的实现。
对UI的操作还有移动、移除等,就需要用到manageChildren:
/**
 * 响应js 添加、移除、移动 父元素的views
 *
 * @param viewTag 父元素的tag
 * @param moveFrom 一个index列表,从哪里移动
 * @param moveTo 和moveFrom对应, 一个index列表,元素移动到哪里
 * @param addChildTags 添加到父元素的 view的tag 列表
 * @param addAtIndices 和addChildTags,指明这些元素插入到哪里的一个index列表。
 * @param removeFrom 一个元素永久移除的列表。对应元素的内容会被回收
 */
@ReactMethod
public void manageChildren(
    int viewTag,
    @Nullable ReadableArray moveFrom,
    @Nullable ReadableArray moveTo,
    @Nullable ReadableArray addChildTags,
    @Nullable ReadableArray addAtIndices,
@Nullable ReadableArray removeFrom) 而如果是修改元素的样式,比如文字颜色、文字大小等,用到的是updateView
我们来举个例子了解一下流程:
下面是一个RN的demo,其中上面两个是Text元素,下面是一个Button。点击Button之后左边的Hello World会改变颜色。
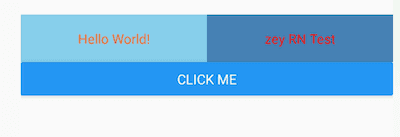
通过log可以看出渲染时元素的创建、添加、更新等步骤:
1.创建Hello World文字:
//创建文字 (虚拟node ,没有创建真实View) Hello World
(UIManager.createView) tag: 3, class: RCTRawText, props: { NativeMap: {"text":"Hello World!"} }
//创建ReactTextView
(UIManager.createView) tag: 5, class: RCTText, props: { NativeMap: {"ellipsizeMode":"tail","allowFontScaling":true,"accessible":true,"lineHeight":50,"height":50,"textAlign":"center","backgroundColor":-7876885,"flex":1,"color":-16776961} }
//添加 文字(3) 到 ReactTextView(5)
(UIManager.setChildren) tag: 5, children: [3]2.创建zey RN Test文字:
//创建文字 zey RN Test
(UIManager.createView) tag: 7, class: RCTRawText, props: { NativeMap: {"text":"zey RN Test"} }
//创建ReactTextView
(UIManager.createView) tag: 9, class: RCTText, props: { NativeMap: {"ellipsizeMode":"tail","allowFontScaling":true,"accessible":true,"lineHeight":50,"height":50,"textAlign":"center","backgroundColor":-12156236,"flex":1,"color":-65536} }
//添加 文字(7)到 ReactTextView(9)
(UIManager.setChildren) tag: 9, children: [7]
3.把上面两个文字放入到Flex容器中:
//接下来创建的是两个文字的父元素,用了Flex布局
(UIManager.createView) tag: 13, class: RCTView, props: { NativeMap: {"backgroundColor":-5185306,"flexDirection":"row","marginTop":20,"display":"flex"} }
//添加5、9两个文字元素到父元素里
(UIManager.setChildren) tag: 13, children: [5,9]
4.创建下面的Button:
//创建文字 CLICK ME
(UIManager.createView) tag: 15, class: RCTRawText, props: { NativeMap: {"text":"CLICK ME"} }
//创建ReactTextView 下面那个按钮里的
(UIManager.createView) tag: 17, class: RCTText, props: { NativeMap: {"ellipsizeMode":"tail","allowFontScaling":true,"accessible":true,"fontWeight":"500","color":-1,"margin":8,"textAlign":"center"} }
//文字添加到ReactTextView里
(UIManager.setChildren) tag: 17, children: [15]
//下面的button外面还有一层View包裹
(UIManager.createView) tag: 19, class: RCTView, props: { NativeMap: {"focusable":true,"accessibilityState":{},"accessibilityRole":"button","accessible":true,"nativeBackgroundAndroid":{"attribute":"selectableItemBackground","type":"ThemeAttrAndroid"},"borderRadius":2,"backgroundColor":-14575885,"elevation":4} }
//添加到容器
(UIManager.setChildren) tag: 19, children: [17]
5.添加到整体的父容器里:
//整体的父元素
(UIManager.createView) tag: 23, class: RCTView, props: { NativeMap: {"flex":1,"pointerEvents":"box-none","collapsable":true} }
(UIManager.setChildren) tag: 23, children: [13,19]
//再包裹了一层
(UIManager.createView) tag: 25, class: RCTView, props: { NativeMap: {"pointerEvents":"box-none","flex":1} }
(UIManager.setChildren) tag: 25, children: [23]
//最后添加到root上
(UIManager.setChildren) tag: 1, children: [25]
6.点击按钮改变颜色:
//点击“CLICK ME”之后,会改变'Hello World'的颜色,触发了updateView
(UIManager.updateView) tag: 5, class: RCTText, props: { NativeMap: {"color":-39394} }
到这里就介绍了一下React Native的大致渲染原理。若有错误和不足的地方欢迎指出~
还有个有意思的问题是,React和React Native本是同根生,是怎么做到同样的渲染逻辑,渲染出不同的组件的呢?通过源码就可以看得一清二楚了。
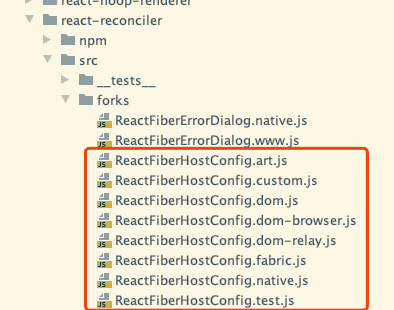
打开React库的代码,在ReactFiberCompleteWork.js:
所有的渲染实际Dom相关的函数从一个文件获得。
import {
  createInstance,
  createTextInstance,
  appendInitialChild,
  finalizeInitialChildren,
  prepareUpdate,
  supportsMutation,
  supportsPersistence,
  cloneInstance,
  cloneHiddenInstance,
  cloneHiddenTextInstance,
  createContainerChildSet,
  appendChildToContainerChildSet,
  finalizeContainerChildren,
  getFundamentalComponentInstance,
  mountFundamentalComponent,
  cloneFundamentalInstance,
  shouldUpdateFundamentalComponent,
} from './ReactFiberHostConfig';这个ReactFiberHostConfig文件会根据实际渲染的内容,映射到对应的文件,从而实现不同的渲染方式,有如下这些文件:
React Native有两种方式一个是.native.js一个是.fabric.js
参考文章:
The how and why on React’s usage of linked list in Fiber to walk the component’s tree
本文首发于 一粟(https://www.zeyio.com),欢迎转载,但是必须保留本文的署名和链接。