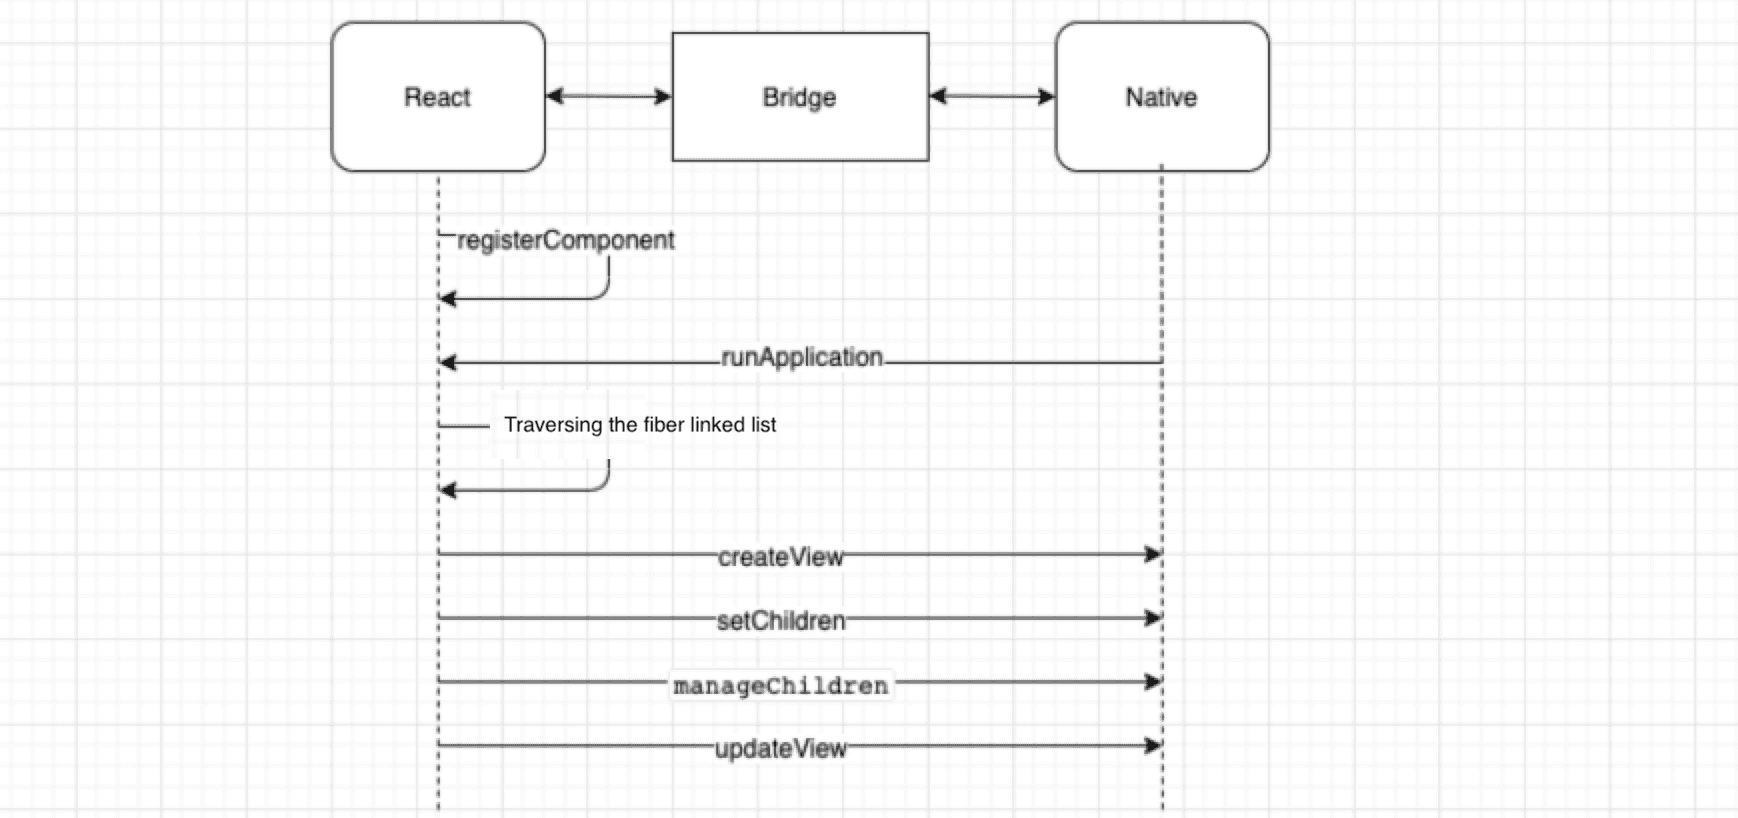
As is well known, the difference between RN and H5 lies in the fact that RN uses Native components for rendering, while H5 relies on WebView. So how does RN manage to write JS code and render Native components? In this article, we'll delve into the source code to explore this. We'll be using RN version v0.62.0.
The UI on the JS side is implemented using React. Those familiar with React know that React uses JSX to write layouts, which are then converted into a virtual DOM tree, and finally rendered into the browser's real DOM. So how does React Native do it?
For ease of reading, here's a list of some functions mentioned in this article:
I. Startup
Taking the default demo as an example, our code entry point is in App.js, which exports the JSX rendering function.
const App = () => {
  return (
    <View key={'view-parent'} style={styles.parent}>
      <Text key={'text-1'} style={styles.text1}>
        Hello World!
      </Text>
      <Text key={'text-2'} style={styles.text2}>
        zey RN Test
      </Text>
    </View>
  );
};

export default App;
In the root directory's index.js, this function is registered according to the appName.
import {AppRegistry} from 'react-native';
import App from './App';
import {name as appName} from './app.json';

AppRegistry.registerComponent(appName, () => App);
Let's look at the registration function:
registerComponent(
  appKey: string,
  componentProvider: ComponentProvider,
  section?: boolean,
): string {
  let scopedPerformanceLogger = createPerformanceLogger();
  // Stored in runnables
  runnables[appKey] = {
    componentProvider,
    run: appParameters => {
      // Rendering starts when run is executed
      renderApplication(
        componentProviderInstrumentationHook(
          componentProvider,
          scopedPerformanceLogger,
          ..... // omitted
        )
      );
    },
  };
  ..... // omitted
  return appKey;
},
Here, the rendering function is stored in the runnables object. So, when do these registered runnables start executing? This is related to the client-side call.
When starting an RN page, the client internally calls the following code, invoking runApplication with the corresponding appName and some parameters.
catalystInstance.getJSModule(AppRegistry.class).runApplication(jsAppModuleName, appParams);Then in JS, AppRegistry.js executes the registered function with the corresponding name:
runApplication(appKey: string, appParameters: any): void {
  ..... // omitted
  runnables[appKey].run(appParameters);
},
As we can see, it goes into renderApplication to execute the rendering logic.
Going further, we find there are two choices, ReactFabric and ReactNative. Fabric is RN's new architecture, but the latest code still uses ReactNative:
  GlobalPerformanceLogger.startTimespan('renderApplication_React_render'); // Start rendering timing
  if (fabric) {
    require('../Renderer/shims/ReactFabric').render(renderable, rootTag); // The promising new Fabric framework
  } else {
    require('../Renderer/shims/ReactNative').render(renderable, rootTag);
  }
  GlobalPerformanceLogger.stopTimespan('renderApplication_React_render'); // End rendering timing
II. Traversing the Virtual DOM
The subsequent rendering logic is very much related to React. (In fact, it is React's code)
Entering the Render function:
render: function(element, containerTag, callback) {
  var root = roots.get(containerTag);

  if (!root) {
    root = createContainer(containerTag, LegacyRoot, false, null);
    roots.set(containerTag, root);
  }

  updateContainer(element, root, null, callback); // Continue rendering execution here
  return getPublicRootInstance(root);
}
In updateContainer, an update is created and inserted into the queue, then the queue is executed. What follows is the traversal of the component tree.
var update = createUpdate(expirationTime, suspenseConfig);

update.payload = {
  element: element
};

enqueueUpdate(current$$1, update);
scheduleWork(current$$1, expirationTime);
Next is continuous checking, queue insertion, and processing based on priority (but it's serial here, not asynchronous). I'll omit the specific code here. The sequence of function calls is as follows:
updateContainer
scheduleUpdateOnFiber
flushSyncCallbackQueue
flushSyncCallbackQueueImpl
runWithPriority
performSyncWorkOnRoot
workLoopSync
In workLoopSync, we can see a while loop, which is where the component tree traversal begins:
function workLoopSync() {
  while (workInProgress !== null) {
    workInProgress = performUnitOfWork(workInProgress);
  }
}
React has two important functions when traversing the tree: performUnitOfWork and completeUnitOfWork. I understand performUnitOfWork as deeply traversing to the bottom, then executing completeUnitOfWork to backtrack, while creating corresponding DOM/Native components. In other words, child nodes are created before parent nodes.
Let's look at part of the performUnitOfWork code:
function performUnitOfWork(unitOfWork) {
  // Start processing, will return child component fiber instance for deep loop traversal, adding tasks to the queue
  next = beginWork$$1(current$$1, unitOfWork, renderExpirationTime);

  if (next === null) {
    // No child-level fiber exists, complete processing of the current unit task.
    next = completeUnitOfWork(unitOfWork);
  }

  return next;
}
This completes the content of a subset task.
In completeUnitOfWork, it mainly finds the parent component to backtrack and sibling components to continue traversal:
function completeUnitOfWork(unitOfWork: Fiber): Fiber | null {
  workInProgress = unitOfWork;
  do {
    // Complete current work
    next = completeWork(current, workInProgress, renderExpirationTime);
    // Sibling component
    const siblingFiber = workInProgress.sibling;
    if (siblingFiber !== null) {
      // Return sibling component to continue traversal
      return siblingFiber;
    }
    // Otherwise, return to parent component to continue work
    workInProgress = returnFiber;
  } while (workInProgress !== null);

  return null;
}
From this, we can see that React traverses the component tree deeply to the bottom, considers it as a unit, and completes the current rendering work.
The advantage of doing this is that the traversal work can be dispersed into small unit works. This is also an important design idea of Fiber. It can avoid blocking the thread by rendering a large number of components at once, which would lead to unresponsive user operations. For more information about component Fiber linked lists and traversal, you can check out this article.
III. Creating Native Components
Component creation is completed in completeWork. There are many different types of components inside. The one involved in creating real rendered DOM or Native components is HostComponent, which ultimately calls createInstance to create components.
Exciting! We're finally about to create components!
function createInstance() {
  var updatePayload = create(props, viewConfig.validAttributes);
  ReactNativePrivateInterface.UIManager.createView(
    tag, // reactTag
    viewConfig.uiViewClassName, // viewName
    rootContainerInstance, // rootTag
    updatePayload // props
  );
  var component = new ReactNativeFiberHostComponent(tag, viewConfig);

  return component;
}
Here, it mainly calls the createView method of UIManager, passing in tag, viewName, rootTag, and props parameter information. The UIManager here actually maps to a class in Java --- UIManagerModule. The corresponding function is as follows:
public void createView(int tag, String className, int rootViewTag, ReadableMap props) {
  mUIImplementation.createView(tag, className, rootViewTag, props);
}
The createView of mUIImplementation is like this:
public void createView(int tag, String className, int rootViewTag, ReadableMap props) {
    ReactShadowNode cssNode = createShadowNode(className);
    ReactShadowNode rootNode = mShadowNodeRegistry.getNode(rootViewTag);
    cssNode.setReactTag(tag); // Thread safety needed here
    cssNode.setViewClassName(className);
    cssNode.setRootTag(rootNode.getReactTag());
    cssNode.setThemedContext(rootNode.getThemedContext());
    mShadowNodeRegistry.addNode(cssNode);
    ReactStylesDiffMap styles = null;
    if (props != null) {
      // Here here!!! --- Element style parsing and assignment
      styles = new ReactStylesDiffMap(props);
      cssNode.updateProperties(styles);
    }
    handleCreateView(cssNode, rootViewTag, styles);
  }
}
This step mainly parses the styles and some configurations for easy rendering in the next step.
After executing handleCreateView, this information is converted into an object and placed in a queue, waiting to be executed.
Let's jump directly to where the creation is executed:
NativeViewHierarchyManager.java
public synchronized void createView(
    ThemedReactContext themedContext,
    int tag,
    String className,
    @Nullable ReactStylesDiffMap initialProps) {
    ViewManager viewManager = mViewManagers.get(className);
    View view = viewManager.createView(themedContext, null, null, mJSResponderHandler);
    viewManager.updateProperties(view, initialProps);
}
As we can see, the creation is done through ViewManager to create the View. This ViewManager has many different implementation classes used to implement different Native components. In addition to the common ones provided officially, businesses can also implement according to their own needs. For example, the Text label corresponds to the ReactTextViewManager object implementation of ViewManager. This is how real Native nodes are created.
IV. Manipulating Components
The above process creates Native components, but creation alone is not enough. It's also necessary to add child components to parent components based on parent-child relationships.
So after createInstance, UIManager.setChildren is called to set the parent-child relationship of components:
The corresponding Android code is as follows:
 /**
   * Interface for quickly adding initial Views, child View tags are considered to be arranged in element order
   * @param viewTag the view tag of the parent view
   * @param childrenTags An array of tags to add to the parent in order
   */
  @ReactMethod
  public void setChildren(int viewTag, ReadableArray childrenTags)
Since it's the UI creation phase, only addition needs to be executed. setChildren is equivalent to a simplified implementation of UI manipulation.
For UI operations like moving and removing, manageChildren is needed:
/**
 * Responds to js adding, removing, moving views of parent elements
 *
 * @param viewTag Parent element's tag
 * @param moveFrom A list of indices, where to move from
 * @param moveTo Corresponding to moveFrom, a list of indices, where elements move to
 * @param addChildTags List of view tags to add to the parent element
 * @param addAtIndices Corresponding to addChildTags, a list of indices specifying where these elements are inserted
 * @param removeFrom A list of elements to be permanently removed. The content of the corresponding elements will be recycled
 */
@ReactMethod
public void manageChildren(
    int viewTag,
    @Nullable ReadableArray moveFrom,
    @Nullable ReadableArray moveTo,
    @Nullable ReadableArray addChildTags,
    @Nullable ReadableArray addAtIndices,
    @Nullable ReadableArray removeFrom)
If it's modifying element styles, such as text color, text size, etc., updateView is used.
Let's take an example to understand the process:
Below is an RN demo, where the top two are Text elements, and the bottom is a Button. After clicking the Button, the color of "Hello World" on the left will change.
Through logs, we can see the steps of element creation, addition, and update during rendering:
- Create "Hello World" text:
// Create text (virtual node, no real View created) Hello World
(UIManager.createView) tag: 3, class: RCTRawText, props: { NativeMap: {"text":"Hello World!"} }
// Create ReactTextView
(UIManager.createView) tag: 5, class: RCTText, props: { NativeMap: {"ellipsizeMode":"tail","allowFontScaling":true,"accessible":true,"lineHeight":50,"height":50,"textAlign":"center","backgroundColor":-7876885,"flex":1,"color":-16776961} }
// Add text (3) to ReactTextView (5)
(UIManager.setChildren) tag: 5, children: [3]- Create "zey RN Test" text:
// Create text zey RN Test
(UIManager.createView) tag: 7, class: RCTRawText, props: { NativeMap: {"text":"zey RN Test"} }
// Create ReactTextView
(UIManager.createView) tag: 9, class: RCTText, props: { NativeMap: {"ellipsizeMode":"tail","allowFontScaling":true,"accessible":true,"lineHeight":50,"height":50,"textAlign":"center","backgroundColor":-12156236,"flex":1,"color":-65536} }
// Add text (7) to ReactTextView (9)
(UIManager.setChildren) tag: 9, children: [7]- Put the above two texts into a Flex container:
// Next, create the parent element of the two texts, using Flex layout
(UIManager.createView) tag: 13, class: RCTView, props: { NativeMap: {"backgroundColor":-5185306,"flexDirection":"row","marginTop":20,"display":"flex"} }
// Add two text elements 5 and 9 to the parent element
(UIManager.setChildren) tag: 13, children: [5,9]- Create the Button below:
// Create text CLICK ME
(UIManager.createView) tag: 15, class: RCTRawText, props: { NativeMap: {"text":"CLICK ME"} }
// Create ReactTextView in the button below
(UIManager.createView) tag: 17, class: RCTText, props: { NativeMap: {"ellipsizeMode":"tail","allowFontScaling":true,"accessible":true,"fontWeight":"500","color":-1,"margin":8,"textAlign":"center"} }
// Add text to ReactTextView
(UIManager.setChildren) tag: 17, children: [15]
// The button below is wrapped in another layer of View
(UIManager.createView) tag: 19, class: RCTView, props: { NativeMap: {"focusable":true,"accessibilityState":{},"accessibilityRole":"button","accessible":true,"nativeBackgroundAndroid":{"attribute":"selectableItemBackground","type":"ThemeAttrAndroid"},"borderRadius":2,"backgroundColor":-14575885,"elevation":4} }
// Add to container
(UIManager.setChildren) tag: 19, children: [17]- Add to the overall parent container:
// Overall parent element
(UIManager.createView) tag: 23, class: RCTView, props: { NativeMap: {"flex":1,"pointerEvents":"box-none","collapsable":true} }
(UIManager.setChildren) tag: 23, children: [13,19]
// Wrapped in another layer
(UIManager.createView) tag: 25, class: RCTView, props: { NativeMap: {"pointerEvents":"box-none","flex":1} }
(UIManager.setChildren) tag: 25, children: [23]
// Finally add to root
(UIManager.setChildren) tag: 1, children: [25]- Click the button to change the color:
// After clicking "CLICK ME", it will change the color of 'Hello World', triggering updateView
(UIManager.updateView) tag: 5, class: RCTText, props: { NativeMap: {"color":-39394} }
This concludes our brief introduction to the rendering principles of React Native. If there are any errors or inadequacies, please feel free to point them out!
There's another interesting question: React and React Native share the same roots, so how do they manage to render different components with the same rendering logic? The source code makes this clear.
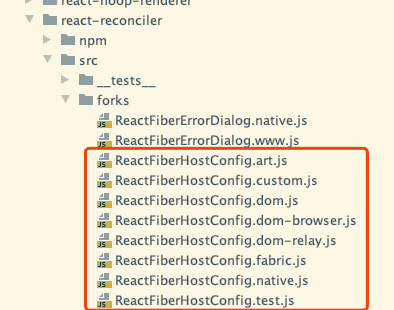
Opening the React library code, in ReactFiberCompleteWork.js:
All rendering-related functions for actual DOM are obtained from one file.
import {
  createInstance,
  createTextInstance,
  appendInitialChild,
  finalizeInitialChildren,
  prepareUpdate,
  supportsMutation,
  supportsPersistence,
  cloneInstance,
  cloneHiddenInstance,
  cloneHiddenTextInstance,
  createContainerChildSet,
  appendChildToContainerChildSet,
  finalizeContainerChildren,
  getFundamentalComponentInstance,
  mountFundamentalComponent,
  cloneFundamentalInstance,
  shouldUpdateFundamentalComponent,
} from './ReactFiberHostConfig';
This ReactFiberHostConfig file will map to corresponding files based on the actual rendering content, thus implementing different rendering methods. There are the following files:
React Native has two methods, one is .native.js and the other is .fabric.js
Reference articles:
The how and why on React's usage of linked list in Fiber to walk the component's tree
本文首发于 一粟(https://www.zeyio.com),欢迎转载,但是必须保留本文的署名和链接。